if you want to add URL in white list of NSM, it might take a long time to find out where is it, even when you have central policy management:
object manager-UTM-Misc-URL Category
Monday, August 26, 2013
Thursday, August 8, 2013
dhcp relay configuration of Juniper SRX
our topology is DHCP server and DHCP client connect to same physical interface and different vlans. before you want to configure DHCP agent on SRX, you need make sure routing between the DHCP server and subnet of DHCP scope is working, mean you can ping the dhcp server with the source ip of the scope.
To configure an SRX Series device as a relay agent to forward incoming requests from BOOTP or DHCP clients to a BOOTP or DHCP server:
- Provide a description for the relay service. In this example, "Global DHCP relay service" is the descriptive text.
user@host# set forwarding-options helpers bootp description "Global DHCP relay service" - Specify the IP address of the server to which requests are forwarded. In this example, the IP address is 192.18.24.38.
user@host# set forwarding-options helpers bootp server 192.18.24.38 - Specify the maximum number of hops allowed per packet. In this example, the hop count is 4.( options)
user@host#set forwarding-options helpers bootp maximum-hop-count 4 - Specify the interface bootp requests will be received on.
user@host# set forwarding-options helpers bootp interface fe-0/0/7.0 or vlan.xxx - Specify DHCP as an allowed inbound service for each interface that is associated with DHCP. In the following example, DHCP is configured as an inbound service for fe-0/0/7 and fe-0/0/8.
user@host# set security zones security-zone trust interfaces fe-0/0/7 host-inbound-traffic system-services dhcp
user@host# set security zones security-zone untrust interfaces fe-0/0/8 host-inbound-traffic system-services dhcp
note: you might have global setting of the host-inbound-traffic apply on all interface, skip this if you have, otherwise, it will overwrite the global setting.
6. (this is based on the client and server on different security zone) Make sure that you have a security policy that allows the session from the DHCP server to the DHCP client apart for the policy from trust to untrust.
user@host# set security zones security-zone untrust address-book address DHCP-server 192.18.24.38user@host# set security policies from-zone trust to-zone untrust policy DHCP-request match source- address any
user@host# set security policies from-zone trust to-zone untrust policy DHCP-request match destination-address DHCP-server
user@host# set security policies from-zone trust to-zone untrust policy DHCP-request match application any
user@host# set security policies from-zone trust to-zone untrust policy DHCP-request then permit
user@host# set security policies from-zone untrust to-zone trust policy DHCP-reply match source-address DHCP-server
user@host# set security policies from-zone untrust to-zone trust policy DHCP-reply match destination-address any
user@host# set security policies from-zone untrust to-zone trust policy DHCP-reply match application any
user@host# set security policies from-zone untrust to-zone trust policy DHCP-reply then permitVerification
To verify that the DHCP relay configuration, use the following operational mode command:
user@host> show system services dhcp relay-statistics
Tuesday, August 6, 2013
trunks between Juniper EX swtich, SRX and Cisco switch
In a mixed layer 2 networks, trunks between Juniper and Cisco are always headache, here is some tips to solve the problem:
1. set the vlan-id for default vlan
set vlans default vlan-id 1
2. set vlans default l3-interface vlan.0
eg:
3. unit 0 {
family ethernet-switching {
port-mode trunk;
vlan {
members all;
}
native-vlan-id 1;
}
}
4.add the vlan interfaces to security zone.
otherwise you can't ping the other side.
5. set ip address for vlan interface unit
1. set the vlan-id for default vlan
set vlans default vlan-id 1
2. set vlans default l3-interface vlan.0
eg:
vlans {
VLAN23 {
vlan-id 23;
l3-interface vlan.23;
}
default {
vlan-id 1;
l3-interface vlan.0;
}
3. unit 0 {
family ethernet-switching {
port-mode trunk;
vlan {
members all;
}
native-vlan-id 1;
}
}
4.add the vlan interfaces to security zone.
otherwise you can't ping the other side.
5. set ip address for vlan interface unit
vlan {
unit 0 {
family inet {
address 192.168.1.1/32;
}
}
unit 23 {
family inet {
address 10.0.1.1/24;
}
}
Wednesday, July 17, 2013
password recovery of the Cisco SG200-SG500
Reboot the switch. You will see a prompt during boot right after the cisco logo
made out of #s that says
"Autoboot in 2 seconds - press RETURN or Esc. to abort and enter prom."
Hit return, and you will get the following startup menu:
Startup Menu
Enter your choice or press 'ESC' to exit:
"Autoboot in 2 seconds - press RETURN or Esc. to abort and enter prom."
Hit return, and you will get the following startup menu:
Startup Menu
SG200-26 password reset Download Software
SG200-26 password reset Erase Flash File
SG200-26 password reset Password Recovery Procedure
SG200-26 password reset Set Terminal Baud-Rate
SG200-26 password reset Stack menu
SG200-26 password reset Back
Enter your choice or press 'ESC' to exit:
You'll want SG200-26 password reset Password Recovery Procedure and
follow the prompts to reset the password without erasing your config file.
Wednesday, July 3, 2013
DHCP for Multiple vlans
most of time, we use one DHCP server assigning ip for multiple vlans, then configure ip helper address on the SVI to forward the DHCP request to DHCP server. when you are using Windows 2008 server, you might have problem with "superscope" setting, put multiple subnet within one superscope, the client ( especially the cisco IP phone). in this case, you need convert the superscope to multiple regular scope.
second point is CDP, when you use multiple brand IP phones, the voice vlan can't detected by CDP, you might need enable LLDP.
Tuesday, May 7, 2013
something about ASA DAP
today, I tested the updated CSD, anyconnect client and hostscan on a test box
(version anyconenct client 3.1.03103 csd_3.6.6234-k9.pkg hostscan_3.1.03103-k9.pkg)
when tested with my own account, VPN can connect no problem, but when I used a different account, the connect been denied, (my own account have setting can bypass the CSD).
first thing I suspected the new CSD image or certificate, since my test box does not have a valid certificate, the free 90 days expired. but one of my account is working, they belong to different AD group supposed should using different DAP.
conclusion: when a connection meet requirements of more than one DAP, the terminate one will take priority than the continue one, even the continue one has high priority setting.
(version anyconenct client 3.1.03103 csd_3.6.6234-k9.pkg hostscan_3.1.03103-k9.pkg)
when tested with my own account, VPN can connect no problem, but when I used a different account, the connect been denied, (my own account have setting can bypass the CSD).
first thing I suspected the new CSD image or certificate, since my test box does not have a valid certificate, the free 90 days expired. but one of my account is working, they belong to different AD group supposed should using different DAP.
conclusion: when a connection meet requirements of more than one DAP, the terminate one will take priority than the continue one, even the continue one has high priority setting.
Monday, May 6, 2013
Cisco ASA management session use LDAP
we talked about ldap for VPN remote access a lot before, now it is time to discuss how to use LDAP for asa management purpose:
the following is the procedure via ASDM
- configure the ldap attibute map
please note the attribute name is case sensitive, you can open ldap debug to find out the how the name and value looks likeldap attribute-map TEST2map-name memberOf IETF-Radius-Service-Typemap-value memberOf CN=IT,OU=Firewall,DC=test,DC=int 6-Service-Type 6 (admin)-Allows full access to any services specified by the aaa authentication console commands.-Service-Type 7 (nas-prompt)-Allows access to the CLI when you configure the aaa authentication {telnet | ssh} console command, but denies ASDM configuration access if you configure the aaa authentication http console command. ASDM monitoring access is allowed. If you configure enable authentication with the aaa authentication enable console command, the user cannot access privileged EXEC mode using the enable command.-Service-Type 5 (remote-access)-Denies management access. The user cannot use any services specified by the aaa authentication console commands (excluding the serial keyword; serial access is allowed). Remote-access (IPSec and SSL) users can still authenticate and terminate their remote-access sessions. - setup LDAP server ( same as for VPN access)
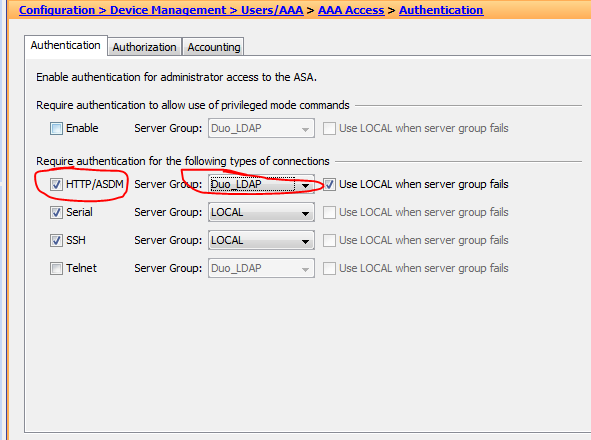
- config aaa access
select the ldap from server group
(cli: aaa authentication http console ldapserver local)
select enable perform authorization for exec shell access
(cli: aaa authorization exec authentication-server)
Subscribe to:
Posts (Atom)
How to use Telus Actionec T3200M as a wireless Access point
when you install Telus Internet, they will offer you a modem + router + wireless device Actionec T3200M, a lot of users still want to use th...
-
when you install Telus Internet, they will offer you a modem + router + wireless device Actionec T3200M, a lot of users still want to use th...
-
when you updated your firmware of fortigate or setup new sslvpn, if you are using certificate other than factory default you might have is...
-
our topology is DHCP server and DHCP client connect to same physical interface and different vlans. before you want to configure DHCP agent...