you might see this error when you are doing VPN client installation
"VPN Agent Service not responding"
when you check the status of network adapter, the VPN adapter is disabled, and after you enable it, then doing installation, same error and the adapter has been disabled again, what is the problem?
1. you might have more than one anyconnect clients been installed.
2. you might have internet sharing enabled
solutions:
1. disable the internet sharing
2. uninstall all vpn clients and reboot computer then re-install.
Tuesday, December 10, 2013
Friday, December 6, 2013
Juniper SRX Series: Creating and managing the “Rescue Configuration
Juniper SRX Series: Creating and managing the “Rescue Configuration”.
A rescue configuration allows administrators to define a known working configuration or a configuration with a known state that can be loaded (this is called a configuration roll-back) at any time.
This alleviates the necessity (on Junper devices) of having to remember the rollback number with the rollback command.
Rescue configuration can be used to roll back to a known configuration or as a last resort if device configuration and backup configuration files became damaged beyond repair.
To create a rescue configuration, it is possible to use the request system configuration rescue save operational mode command:
To roll back to the rescue configuration, the rollback rescue command can be used:
After rolling back to the rescue configuration, you must commit the configuration to activate it:
On SRX Branch devices, it is also possible to press and quickly release the Reset Config Button to load and commit the rescue configuration.
The Reset Config button is recessed to prevent it from being pressed accidentally.
By default, pressing and quickly releasing the Reset Config Button loads and commits the rescue configuration. The Status LED is amber and steadily on during this time.
By default, pressing and holding the Reset Config button for 15 seconds or more, until the Status LED is amber and steadily on, deletes all configurations on the device(including the backup configurations and rescue configuration) and loads and commits the factory configuration.
Tuesday, November 19, 2013
how to integrate Juno space with SRX cluster

to integrate SRX cluster to Juno space is not straight forward. you have a couple of solutions
1. bidirectional NAT on backup router is best solution, source nat your Juno space server to an ip in same subnet as both Fxp0.0 destination NAT two ip to both fxp0.0 as well. ( yourJuno space is isolate with cluster management IPs)
2. backup route
never use backup route 0.0.0.0/0, please use specified ip as following, please remember, backup-router is only working for standby node, not working with active node, for active node you can use static route, but you might have problem if your cluster works as your main router in your network, all traffic to Juno space server will be affect via this cluster. you might need use static route base on source IP to fix the connection between other devices to Juno space.
groups {
node0 {
...
backup-router 192.168.1.254 destination 172.16.1.1/32;
...
}
node1 {
...
backup-router 192.168.1.254 destination 172.16.1.1/32;
...
}
routing-options {
    static {
        route 172.16.1.1/24 {
            next-hop 192.168.1.254;
            retain;
            no-readvertise;
        }
        route 172.16.1.1/24 {
            next-hop 192.168.1.254;;
            retain;
            no-readvertise;
        }
    }
}
please stay away from c2960-lanbasek9-mz.150-2.SE4.bin
when you upgrade your Cisco switches please stay away from c2960-lanbasek9-mz.150-2.SE4.bin
some memory leak issue with that IOS, you will lose management function and console login, power recycle is the the only solution, please go to c2960-lanbasek9-mz.150-2.SE5.bin.
my 2960G box with c2960-lanbasek9-mz.150-2.SE5.bin is working well so far after 1 week running
a week later:
Processor Pool Total: 22308940 Used: 17780540 Free: 4528400
I/O Pool Total: 4194304 Used: 2370432 Free: 1823872
Driver te Pool Total: 1048576 Used: 40 Free: 1048536
PID TTY Allocated Freed Holding Getbufs Retbufs Process
0 0 23952480 7400780 13583992 0 0 *Init*
0 0 257652368 249016528 1294992 4394643 1973474 *Dead*
0 0 0 0 525600 0 0 *MallocLite*
63 0 368228 2885616 377788 0 0 EEM ED ND
150 0 530624 150712 374176 0 0 Auth Manager
a week ago:
Processor Pool Total: 22308940 Used: 17782724 Free: 4526216
I/O Pool Total: 4194304 Used: 2426304 Free: 1768000
Driver te Pool Total: 1048576 Used: 40 Free: 1048536
PID TTY Allocated Freed Holding Getbufs Retbufs Process
0 0 23952480 7400780 13798056 0 0 *Init*
0 0 17531824 16289416 1257068 4394643 1973474 *Dead*
0 0 0 0 394440 0 0 *MallocLite*
63 0 368228 5940 377788 0 0 EEM ED ND
150 0 416140 54596 374052 0 0 Auth Manager
slow web site browsing with Bluecoat SG proxy
when you put your bluecoat proxy SG as inline transparent mode, you have chance getting in trouble:
slow browsing speed with some website, takes 1 minutes to load a homepage, here is some information about this issue
1. you might use private ip as your management ip
2. you might or might not have ip configured on passthrough interfaces
3. when you put that server ip in static bypass list of proxy services, everything looks good
you can capture the packets when you have problem, you might see some packet from your management ip to the website,
you can check the setting of proxy
you need select the checkbox otherwise the browsing won't work
reflect client ip
reflect client's source IP when connecting to servers
for the slow issue, what you can do:
1.configure a valid public IP with Wan Port.
2.set you internet gateway as the default gateway
3. install static route for your management traffic.
Friday, September 20, 2013
please stay away from ASA 5500 version 8.4.6
when you want to upgrade your ASA os version, you can use 8.4.5 or brand new 8.4.7, please avoid 8.4.6, too many bugs and really troubled me, the good thing is I just used it on my testing box.
what I experienced:
1. you can connect to VPN but the network is working working, show debug error license exceed limit
2. your 2 factor authentication might not working after upgrade, you meed recreate the VPN profile
3. your CSD policy might messed, need reconfig.
I am so glad did not upgrade my production box.
Thursday, September 5, 2013
ASA clientless VPN portal bookmark working with DFS
in the windows infrastructure such as you company domain name is abc.com you can use \\abc\folder\folder to access dfs file, but is not working with ASA clientless vpn portal bookmark, you might get " can't contact drive" or similar error message
here is the solution:
if you have singer file server you can use first two solutions, for multiple file server you need use the third one.
1. you can use the hostname of the fileserver, server01/folder/folder
2. use full dns server01.abc.com/folder/folder
3. use name as abc.com/folder/folder
here is the solution:
if you have singer file server you can use first two solutions, for multiple file server you need use the third one.
1. you can use the hostname of the fileserver, server01/folder/folder
2. use full dns server01.abc.com/folder/folder
3. use name as abc.com/folder/folder
Monday, August 26, 2013
change the web filtering of SRX in NSM
if you want to add URL in white list of NSM, it might take a long time to find out where is it, even when you have central policy management:
object manager-UTM-Misc-URL Category

object manager-UTM-Misc-URL Category
Thursday, August 8, 2013
dhcp relay configuration of Juniper SRX
our topology is DHCP server and DHCP client connect to same physical interface and different vlans. before you want to configure DHCP agent on SRX, you need make sure routing between the DHCP server and subnet of DHCP scope is working, mean you can ping the dhcp server with the source ip of the scope.
To configure an SRX Series device as a relay agent to forward incoming requests from BOOTP or DHCP clients to a BOOTP or DHCP server:
- Provide a description for the relay service. In this example, "Global DHCP relay service" is the descriptive text.
user@host# set forwarding-options helpers bootp description "Global DHCP relay service" - Specify the IP address of the server to which requests are forwarded. In this example, the IP address is 192.18.24.38.
user@host# set forwarding-options helpers bootp server 192.18.24.38 - Specify the maximum number of hops allowed per packet. In this example, the hop count is 4.( options)
user@host#set forwarding-options helpers bootp maximum-hop-count 4 - Specify the interface bootp requests will be received on.
user@host# set forwarding-options helpers bootp interface fe-0/0/7.0 or vlan.xxx - Specify DHCP as an allowed inbound service for each interface that is associated with DHCP. In the following example, DHCP is configured as an inbound service for fe-0/0/7 and fe-0/0/8.
user@host# set security zones security-zone trust interfaces fe-0/0/7 host-inbound-traffic system-services dhcp
user@host# set security zones security-zone untrust interfaces fe-0/0/8 host-inbound-traffic system-services dhcp
note: you might have global setting of the host-inbound-traffic apply on all interface, skip this if you have, otherwise, it will overwrite the global setting.
6. (this is based on the client and server on different security zone) Make sure that you have a security policy that allows the session from the DHCP server to the DHCP client apart for the policy from trust to untrust.
user@host# set security zones security-zone untrust address-book address DHCP-server 192.18.24.38user@host# set security policies from-zone trust to-zone untrust policy DHCP-request match source- address any
user@host# set security policies from-zone trust to-zone untrust policy DHCP-request match destination-address DHCP-server
user@host# set security policies from-zone trust to-zone untrust policy DHCP-request match application any
user@host# set security policies from-zone trust to-zone untrust policy DHCP-request then permit
user@host# set security policies from-zone untrust to-zone trust policy DHCP-reply match source-address DHCP-server
user@host# set security policies from-zone untrust to-zone trust policy DHCP-reply match destination-address any
user@host# set security policies from-zone untrust to-zone trust policy DHCP-reply match application any
user@host# set security policies from-zone untrust to-zone trust policy DHCP-reply then permitVerification
To verify that the DHCP relay configuration, use the following operational mode command:
user@host> show system services dhcp relay-statistics
Tuesday, August 6, 2013
trunks between Juniper EX swtich, SRX and Cisco switch
In a mixed layer 2 networks, trunks between Juniper and Cisco are always headache, here is some tips to solve the problem:
1. set the vlan-id for default vlan
set vlans default vlan-id 1
2. set vlans default l3-interface vlan.0
eg:
3. unit 0 {
family ethernet-switching {
port-mode trunk;
vlan {
members all;
}
native-vlan-id 1;
}
}
4.add the vlan interfaces to security zone.
otherwise you can't ping the other side.
5. set ip address for vlan interface unit
1. set the vlan-id for default vlan
set vlans default vlan-id 1
2. set vlans default l3-interface vlan.0
eg:
vlans {
    VLAN23 {
        vlan-id 23;
        l3-interface vlan.23;
    }
    default {
        vlan-id 1;
        l3-interface vlan.0;
    }
3. unit 0 {
family ethernet-switching {
port-mode trunk;
vlan {
members all;
}
native-vlan-id 1;
}
}
4.add the vlan interfaces to security zone.
otherwise you can't ping the other side.
5. set ip address for vlan interface unit
  vlan {
        unit 0 {
            family inet {
                address 192.168.1.1/32;
            }
        }
        unit 23 {
            family inet {
                address 10.0.1.1/24;
            }
        }
Wednesday, July 17, 2013
password recovery of the Cisco SG200-SG500
Reboot the switch. You will see a prompt during boot right after the cisco logo
made out of #s that says
"Autoboot in 2 seconds - press RETURN or Esc. to abort and enter prom."
Hit return, and you will get the following startup menu:
Startup Menu
Enter your choice or press 'ESC' to exit:
"Autoboot in 2 seconds - press RETURN or Esc. to abort and enter prom."
Hit return, and you will get the following startup menu:
Startup Menu
SG200-26 password reset Download Software
SG200-26 password reset Erase Flash File
SG200-26 password reset Password Recovery Procedure
SG200-26 password reset Set Terminal Baud-Rate
SG200-26 password reset Stack menu
SG200-26 password reset Back
Enter your choice or press 'ESC' to exit:
You'll want SG200-26 password reset Password Recovery Procedure and
follow the prompts to reset the password without erasing your config file.
Wednesday, July 3, 2013
DHCP for Multiple vlans
most of time, we use one DHCP server assigning ip for multiple vlans, then configure ip helper address on the SVI to forward the DHCP request to DHCP server. when you are using Windows 2008 server, you might have problem with "superscope" setting, put multiple subnet within one superscope, the client ( especially the cisco IP phone). in this case, you need convert the superscope to multiple regular scope.
second point is CDP, when you use multiple brand IP phones, the voice vlan can't detected by CDP, you might need enable LLDP.
second point is CDP, when you use multiple brand IP phones, the voice vlan can't detected by CDP, you might need enable LLDP.
Tuesday, May 7, 2013
something about ASA DAP
today, I tested the updated CSD, anyconnect client and hostscan on a test box
(version anyconenct client 3.1.03103 csd_3.6.6234-k9.pkg hostscan_3.1.03103-k9.pkg)
when tested with my own account, VPN can connect no problem, but when I used a different account, the connect been denied, (my own account have setting can bypass the CSD).
first thing I suspected the new CSD image or certificate, since my test box does not have a valid certificate, the free 90 days expired. but one of my account is working, they belong to different AD group supposed should using different DAP.
conclusion: when a connection meet requirements of more than one DAP, the terminate one will take priority than the continue one, even the continue one has high priority setting.
Monday, May 6, 2013
Cisco ASA management session use LDAP
we talked about ldap for VPN remote access a lot before, now it is time to discuss how to use LDAP for asa management purpose:
the following is the procedure via ASDM
the following is the procedure via ASDM
- configure the ldap attibute map
please note the attribute name is case sensitive, you can open ldap debug to find out the how the name and value looks likeldap attribute-map TEST2map-name memberOf IETF-Radius-Service-Typemap-value memberOf CN=IT,OU=Firewall,DC=test,DC=int 6-Service-Type 6 (admin)-Allows full access to any services specified by the aaa authentication console commands.-Service-Type 7 (nas-prompt)-Allows access to the CLI when you configure the aaa authentication {telnet | ssh} console command, but denies ASDM configuration access if you configure the aaa authentication http console command. ASDM monitoring access is allowed. If you configure enable authentication with the aaa authentication enable console command, the user cannot access privileged EXEC mode using the enable command.-Service-Type 5 (remote-access)-Denies management access. The user cannot use any services specified by the aaa authentication console commands (excluding the serial keyword; serial access is allowed). Remote-access (IPSec and SSL) users can still authenticate and terminate their remote-access sessions. - setup LDAP server ( same as for VPN access)
- config aaa access
select the ldap from server group
(cli: aaa authentication http console ldapserver local)
select enable perform authorization for exec shell access
(cli: aaa authorization exec authentication-server)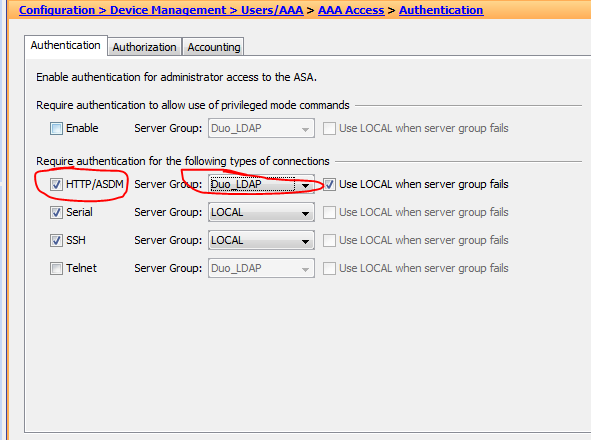


Thursday, April 11, 2013
Installing or Upgrading HostScan on Cisco ASA
Installing or Upgrading HostScan
Use this procedure to upload, or upgrade, and enable a new HostScan image on the ASA. Use the image to enable HostScan functionality for AnyConnect or upgrade the HostScan support charts for an existing deployment of Cisco Secure Desktop (CSD).
If you previously uploaded a CSD image to the ASA, the HostScan image you specify will upgrade or downgrade the existing HostScan files that were delivered with that CSD package.
You do not need to restart the ASA after you install or upgrade HostScan; however, you must exit and restart Adaptive Security Device Manager (ASDM) to access the Secure Desktop Manager tool in ASDM.

Note  HostScan requires an AnyConnect Secure Mobility Client premium license.
Step 1 Download the latest version of the HostScan package using Downloading the HostScan Engine Update.
Note You will need to have an account on Cisco.com and be logged in to download the software.
Step 2 Open ASDM and choose Configuration > Remote Access VPN > HostScan Image. ASDM opens the HostScan Image panel (Figure 2-1).
Figure 2-2 HostScan Image Panel

Step 3 Click Upload to prepare to transfer a copy of the HostScan package from your computer to a drive on the ASA.
Step 4 In the Upload Image dialog box, click Browse Local Files to search for the HostScan package on your local computer.
Step 5 Select the hostscan_version.pkg file you downloaded in Step 1 and click Select. The path to the file you selected is in the Local File Path field and the Flash File System Path field reflects the destination path of the HostScan package. If your ASA has more than one flash drive, you can edit the Flash File System Path to indicate another flash drive.
Step 6 Click Upload File. ASDM transfers a copy of the file to the flash card. An Information dialog box displays the following message:
File has been uploaded to flash successfully.
Step 7 Click OK.
Step 8 In the Use Uploaded Image dialog, click OK to use the HostScan package file you just uploaded as the current image.
Step 9 Check Enable HostScan/CSD if it is not already checked.
Step 10 Click Apply.
Note If AnyConnect Essentials is enabled on the ASA, you receive a message that HostScan and CSD will not work with it. You have the choice to Disable or Keep AnyConnect Essentials.
Step 11 Click Save.
Enabling or Disabling HostScan on the ASA
When you first upload or upgrade a HostScan image using ASDM, you enable the image as part of that procedure. See "Installing and Enabling CSD on the ASA" section.
Otherwise, to enable or disable a HostScan image using ASDM, follow this procedure:
Step 1 Open ASDM and choose Configuration > Remote Access VPN > HostScan Image. ASDM opens the HostScan Image panel (Figure 2-1).
Step 2 Check Enable HostScan/CSD to enable HostScan or uncheck Enable HostScan/CSD to disable HostScan.
Step 3 Click Apply.
Step 4 Click Save.
Uninstalling the HostScan Package from the ASA
Uninstalling the HostScan package removes it from view on the ASDM interface and prevents the ASA from deploying it even if HostScan or CSD is enabled. Uninstalling HostScan does not delete the HostScan package from the flash drive.
Use this procedure to uninstall HostScan on the ASA:
Step 1 Open ASDM and select Configuration > Remote Access VPN > HostScan Image.
Step 2 In the HostScan Image pane, click Uninstall. ASDM removes the text from the Location text box.
Step 3 Click Save.
HostScan and CSD Automatic Upgrades and Downgrades
The ASA automatically distributes the enabled HostScan package to the endpoint whether that package is the standalone HostScan package, the package included with AnyConnect Secure Mobility Client, or the package included with Cisco Secure Desktop. If the endpoint has an older version of the HostScan package installed, the package on the endpoint gets upgraded; if the endpoint has a newer version of the HostScan package, the endpoint package gets downgraded.
Which HostScan Image Gets Enabled When There is More than One Loaded on the ASA?
The HostScan image is delivered with the HostScan package. It can be deployed to the endpoint from the standalone HostScan package, the full AnyConnect Secure Mobility Client package, and Cisco Secure Desktop. Depending on what licenses you have installed on your ASA, you may have all of these packages loaded on your ASA. In that case, the ASA enables the image that you specified as the HostScan image first and if you haven't specified one, the ASA enables the HostScan functionality from Cisco Secure Desktop. See the"Installing, Upgrading, and Downgrading CSD on the ASA" section.
If you uninstall the HostScan package, the ASA cannot enable its HostScan image.
These scenarios describe which HostScan package the ASA distributes when it has more than one loaded.
•If you have installed a standalone HostScan package on the ASA and have designated it as the HostScan image, and you enable CSD/hostscan, ASA distributes the standalone HostScan package.
•If you have installed a standalone HostScan package on the ASA and have designated it as the HostScan image and you have installed a CSD image on the ASA, and you enable CSD/hostscan, ASA will distribute the standalone HostScan image.
•If you have installed a HostScan image on the ASA, but you have not enabled it, and you have installed a CSD image on the ASA and you have enabled CSD/hostscan, the ASA will distribute the standalone HostScan image because it was not uninstalled.
•If you have installed an AnyConnect Secure Mobility Client package on the ASA and have designated it as the HostScan image, the ASA will distribute the HostScan image from that package.
•If you install an AnyConnect Secure Mobility Client package file on the ASA but do not specify it as the HostScan image, the ASA will not distribute the HostScan package associated with that AnyConnect package. The ASA will distribute an installed HostScan package or CSD package, provided CSD is enabled.
Determining the HostScan Image Enabled on the ASA
Open ASDM and select Configuration > Remote Access VPN > Host Scan Image.
If there is a HostScan image designated in the HostScan Image location field, and the Enable HostScan/CSD box is checked, the version of that image is the HostScan version being used by the ASA.
If the HostScan Image filed is empty, and the Enable HostScan/CSD box is checked, select Configuration > Remote Access VPN > Secure Desktop Manager. The version of CSD in the Secure Desktop Image Location field is the HostScan version being used by the ASA.
install, upgrade, or downgrade a CSD image on the ASA
C
Use this procedure to install, upgrade, or downgrade a CSD image on the ASA:
Step 1 Download the latest version of CSD using Downloading the Latest Version of CSD.
If you are downgrading CSD, use the Downloading the Latest Version of CSD procedure but expand the Latest Releases folder in the directory tree and select the release you need.
Step 2 Start ASDM and choose Configuration > Remote Access VPN > Secure Desktop Manager > Setup. ASDM opens the Setup pane (Figure 2-1).
Figure 2-1 Setup

Step 3 Click Upload to prepare to transfer a copy of the CSD software from your local PC to the flash card installed in the ASA 5500.
ASDM opens the Upload Image dialog box.
Step 4 Click Browse Local Files to prepare to select the file on your local PC.
Step 5 Choose the csd_<n>.<n>.*.pkg you downloaded in Step 1 and click Select.
ASDM closes the Select File Path dialog box and displays the CSD package you just selected in the Flash File System Path field.
Note You do not need to uninstall an installed version of CSD before you upgrade or downgrade the version.
Step 6 Click Upload File.

Caution Avoid opening other windows until you complete the remaining steps.
ASDM transfers a copy of the file to the flash card. An Information dialog box displays the following message:
File has been uploaded to flash successfully.
Step 7 Click OK.
ASDM clears the fields in the Upload Image dialog box.
Step 8 After the Use Uploaded Image dialog box displays the following message, click OK.
Use disk0:/csd_<n>.<n>.*.pkg as your new current image?
Step 9 Check Enable Secure Desktop.
Step 10 Click Apply.
Note If AnyConnect Essentials is enabled on the ASA, you receive a message that CSD will not work with it. You have the choice to Disable or Keep AnyConnect Essentials.
Step 11 Click OK when you receive the message, "Secure Desktop image is successfully updated. The new features can be accessed after ASDM is restarted."
Step 12 Close the ASDM window.
A window displays the following message:
The configuration has been modified. Do you want to save the running configuration to
flash memory?
Step 13 Click Save.
ASDM saves the configuration and closes.
Step 14 Start a new ASDM session with the ASA to customize the Secure Desktop Manager configuration.
Enabling or Disabling CSD on the ASA
Enabling CSD loads the CSD configuration file, data.xml, from the flash device to the running configuration. If you transfer or replace the data.xml, disable and then enable CSD to load the file.
Disabling CSD does not alter the CSD configuration.
Use ASDM to enable or disable CSD as follows:
Step 1 Choose Configuration > Clientless SSL VPN > Secure Desktop > Setup.
ASDM opens the Setup pane (Figure 2-1).
Note The Secure Desktop Image field displays the image (and version) that is currently installed. The Enable Secure Desktop check box indicates whether CSD is enabled.
Step 2 Check or uncheck Enable Secure Desktop and click Apply.
ASDM enables or disables CSD.
Step 3 Click the X in the upper right corner of the ASDM window to exit.
A window displays the following message:
The configuration has been modified. Do you want to save the running configuration to
flash memory?
Step 4 Click Save. ASDM saves the configuration and closes.
Entering an Activation Key to Support Advanced Endpoint Assessment
Advanced Endpoint Assessment includes all of the Endpoint Assessment features, and lets you configure an attempt to update noncompliant computers to meet version requirements. You can use ASDM to activate a key to support Advanced Endpoint Assessment after acquiring it from Cisco, as follows:
Step 1 Choose Configuration > Device Management > Licensing > Activation Key.
Step 2 Enter the key in the New Activation Key field.
Step 3 Click Update Activation Key.
Step 4 Choose File > Save Running Configuration to Flash.
An Advanced Endpoint Assessment entry appears and the Configure button becomes active in the HostScan Extensions area of the Configuration > Remote Access VPN > Secure Desktop Manager > HostScan pane, which is accessible only if CSD is enabled.
Uninstalling CSD from the ASA
Uninstalling CSD removes the CSD configuration file, data.xml, from the desktop directory on the flash card. If you want to retain the file, copy it using an alternative name or download it to your workstation before you uninstall CSD.
Uninstall CSD on the ASA as follows:
Step 1 Open ASDM and choose Configuration > Remote Access VPN > Secure Desktop Manager > Setup.
ASDM opens the Setup pane (Figure 2-1).
Step 2 Click Uninstall.
A confirmation window displays the following message:
Do you want to delete disk0:/csd_<n>.<n>.*.pkg and all CSD data files?
Step 3 Click Yes.
ASDM removes the text from the Location text box and removes the Secure Desktop Manager menu options below Setup.
Step 4 Click the X in the upper right corner of the ASDM window to exit.
A window displays the following message:
The configuration has been modified. Do you want to save the running configuration to flash memory?
Step 5 Click Save. ASDM saves the configuration and closes.
Subscribe to:
Comments (Atom)